Skip to content
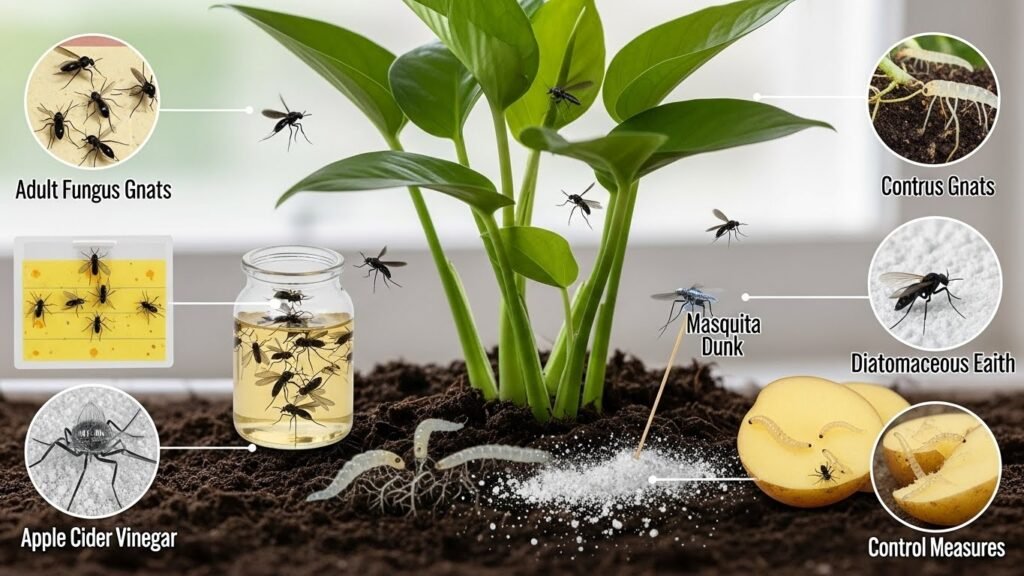
Fungus gnats are a common nuisance for indoor plant enthusiasts. These tiny, pesky insects can damage your plants, especially when their larvae feed on the plant’s roots. In this comprehensive guide, we will explore effective strategies to get rid of fungus gnats and prevent them from infesting your houseplants.
What Are Fungus Gnats?
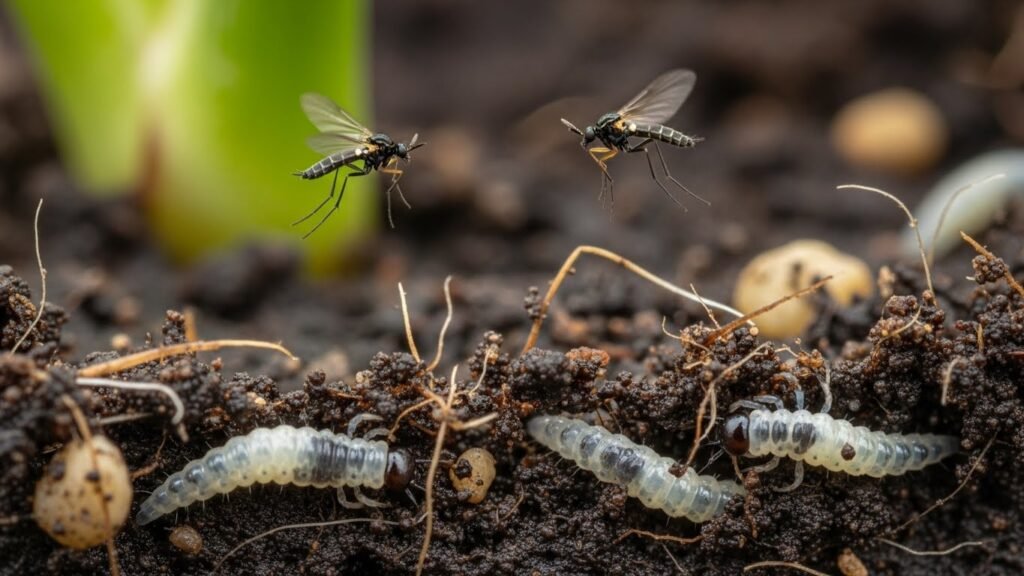
Fungus gnats are small, mosquito-like flies commonly found around indoor plants. They are often seen flying near the soil surface or around plants, where they breed. While adult gnats are annoying, it is the larvae that cause the most damage. These larvae feed on organic matter, plant roots, and decaying material in the soil, leading to weakened plants.
Understanding Fungus Gnats and Their Lifecycle
Fungus gnats go through four stages in their lifecycle:
- Eggs: Female gnats lay their eggs on the soil surface or in the top layers of moist soil.
- Larvae: The larvae hatch from the eggs and burrow into the soil, where they feed on organic matter and plant roots.
- Pupae: After a few days, larvae pupate in the soil, preparing for the adult stage.
- Adults: Adult fungus gnats emerge from the pupae and begin flying around, looking for a mate and laying more eggs.
These stages usually take about 2 to 3 weeks, meaning infestations can escalate quickly if not addressed.
Why They Are a Problem for Houseplants
Fungus gnats are particularly problematic for indoor plants because they thrive in the warm, moist conditions commonly found in homes. The larvae damage the plant’s root system, leading to weak plants that may struggle to absorb nutrients and water. In severe cases, they can even kill plants by causing root rot.
Will Fungus Gnats Hurt My Plants?
Yes, fungus gnats can harm your plants. While adults do not directly damage the plant, their larvae feed on the plant’s roots, potentially leading to the following problems:
- Root Damage: As larvae feed on the roots, they disrupt the plant’s ability to take in nutrients and water.
- Root Rot: Damaged roots are more susceptible to fungal infections, causing root rot.
- Stunted Growth: A weakened root system can result in stunted plant growth and yellowing leaves.
Potential Damage to Plant Roots
The most significant risk posed by fungus gnats is the damage to plant roots. The larvae burrow into the soil and eat away at the delicate root system. This can cause:
- Slow Growth: Plants with damaged roots may exhibit stunted or slow growth due to the inability to absorb sufficient nutrients.
- Yellowing of Leaves: As the plant’s roots are compromised, the leaves may begin to yellow and wilt.
- Increased Susceptibility to Diseases: Weakened roots are more prone to infections and diseases, further harming the plant.
Signs of Root Damage and Stress
Look for these signs to determine if your plant’s roots are being affected by fungus gnats:
- Wilting or Yellowing Leaves: If the leaves of your plant are wilting or turning yellow, it could indicate root damage.
- Slow Growth or Stunted Development: A lack of growth despite proper care could be a sign of root damage from fungus gnat larvae.
- Visible Fungus: You may notice a slimy coating or mold growth around the plant base, often a result of the larvae feeding.
Identifying Fungus Gnat Infestation
Identifying a fungus gnat infestation early is crucial for effective treatment. Here’s how you can detect these pests:
The Potato Test

One of the easiest ways to check for fungus gnat larvae in the soil is the potato test. Here’s how to do it:
- Step 1: Slice a raw potato into thick slices.
- Step 2: Place the potato slices on top of the soil in your plant pot.
- Step 3: Leave the slices in place for about 4 to 6 hours.
- Step 4: Check the potato slices for signs of larvae. If you find small, worm-like creatures, you likely have a fungus gnat infestation.
How to Use Potato Slices to Detect Fungus Gnat Larvae
Potato slices attract fungus gnat larvae, as they feed on organic matter. The larvae will be drawn to the moist potato slices, making them easy to spot. This simple test can help confirm the presence of larvae in the soil.
When to Perform the Test
It’s best to perform the potato test when you notice signs of gnat activity, such as flying gnats or wilting plants. This can help you confirm whether larvae are the cause of the problem.
What to Look for and What It Means
Look for small, translucent larvae that are about 1/4 inch long. If you find these on the potato slices, it’s a clear indication that your plant’s roots may be under attack.
Fungus Gnat Symptoms in Plants
Fungus gnats can cause a range of symptoms in your plants. Here’s what to look out for:
Signs of Adult Gnats Flying Around
Adult fungus gnats are often seen flying near the soil surface or around the plant. These tiny, black flies resemble mosquitoes but do not bite. If you notice an increase in the number of gnats flying around your plants, it’s a sign of an infestation.
Evidence of Larvae in the Soil
In addition to the potato test, you may also notice the following signs of larvae:
- Damp Soil: Fungus gnats thrive in moist soil, so if your plant’s soil is consistently wet, it creates a perfect breeding ground.
- White, Thread-like Larvae: The larvae will be visible if you disturb the soil near the surface. They are typically white or translucent with a black head.
Immediate Steps to Control Fungus Gnats
If you’ve identified a fungus gnat infestation, it’s time to take action. Here are some immediate steps to control the problem:
Drying Out the Soil
One of the best ways to control fungus gnats is to reduce the moisture in the soil. Fungus gnats thrive in damp conditions, so drying out the soil can make it less hospitable for them.
- How to Dry Soil Between Waterings: Allow the top inch or two of soil to dry out completely before watering your plants again. This will disrupt the lifecycle of the fungus gnats and prevent further infestation.
- Benefits and Limitations of This Method: While drying out the soil is effective, it may not work for all plants, especially those that require consistent moisture. Additionally, over-watering in the future may lead to the return of the infestation.
Cider Traps
Apple cider vinegar can be an effective way to trap adult fungus gnats. Here’s how to make a simple cider trap:
- How to Use Apple Cider Vinegar to Trap Fungus Gnats: Pour a small amount of apple cider vinegar into a shallow dish. Add a few drops of dish soap to break the surface tension. The gnats will be attracted to the vinegar and get trapped in the liquid.
- Effectiveness and How Long to Leave Traps Out: Place these traps near your plants and leave them for several days. Replace the vinegar solution as needed.
Potato Slices
Another way to control fungus gnats is by using raw potato slices. Place the slices on the soil surface, and the larvae will feed on them. After a few hours, remove the slices and dispose of any larvae you find.
- Cutting Potatoes into Slices to Attract Larvae: Slice the potato into thick pieces and place them on the soil.
- Effectiveness of This Method for Immediate Relief: This method can provide immediate relief by trapping larvae that are feeding on your plant’s roots.
Advanced Methods to Permanently Eliminate Fungus Gnats
In the previous section, we covered immediate steps to control fungus gnats. Now, we will delve into more advanced and permanent methods to eliminate these pests from your indoor plants. These solutions target both the larvae in the soil and the adult gnats that fly around, ensuring a comprehensive approach to getting rid of the infestation.
Sticky Traps
Sticky traps are a great tool for capturing adult fungus gnats and preventing them from laying eggs in your soil. These traps work by attracting the gnats through color and scent, then capturing them on a sticky surface.
How to Use Sticky Traps to Capture Adult Fungus Gnats

To use sticky traps effectively:
- Choose the Right Color: Fungus gnats are most attracted to yellow and green sticky traps, so opt for these colors.
- Place the Traps Near the Soil: Position the traps just above the soil surface, where adult gnats are likely to be flying. This placement will catch the majority of the gnats before they can lay eggs.
- Monitor and Replace Regularly: Keep an eye on the traps and replace them when they are filled with gnats. Regularly changing the traps will help ensure that you capture new adult gnats as they emerge.
Types of Sticky Traps That Work Best (Color, Size, and Placement)
- Color: Yellow and green traps are the most effective for fungus gnats.
- Size: Small, square sticky traps are easy to place in pots, while larger traps can be used for larger infestations.
- Placement: Stick them near the base of the plant, just above the soil level, to target adult gnats flying close to the surface.
Sticky traps are not a permanent solution, but they can significantly reduce the number of adult gnats, helping to break the lifecycle of the infestation.
Mosquito Bits and Dunks
Mosquito bits and dunks are another effective way to control fungus gnats, particularly in the larvae stage. These products contain a bacteria called Bacillus thuringiensis israelensis (BTI), which specifically targets the larvae of gnats and other insects.
What Are Mosquito Bits and How They Work Against Fungus Gnats

- Mosquito Bits: These are small granules that are sprinkled on the soil surface. When watered, they break down and release BTI into the soil, killing the larvae.
- Mosquito Dunks: These are larger discs that can be placed in the soil or submerged in water to release BTI over a longer period.
Both products are safe for plants but deadly to gnat larvae. They provide a longer-term solution by continuously releasing BTI as the water or soil is watered, ensuring that larvae are eradicated even as they hatch.
How to Make and Apply Mosquito Tea
To make mosquito tea:
- Take a handful of mosquito bits and place them in a jar of water.
- Let it sit for 24 hours to allow the BTI to dissolve into the water.
- Use the solution to water your plants. This method will target the larvae in the soil and provide effective control.
Using Mosquito Dunks in the Soil for Longer-Term Control
- How to Use Mosquito Dunks: Place the dunks directly in the soil or cut them into smaller pieces and scatter them throughout the soil.
- Effectiveness: This method provides ongoing control for up to 30 days, as the dunks slowly release BTI into the soil.
Hydrogen Peroxide Solution
Hydrogen peroxide is another effective way to deal with fungus gnat larvae. It can help kill larvae in the soil while also oxygenating the soil, which benefits the plant.
How to Use Hydrogen Peroxide to Kill Fungus Gnat Larvae in the Soil
To use hydrogen peroxide, follow these steps:
- Dilute the Hydrogen Peroxide: Mix one part 3% hydrogen peroxide with four parts water. This dilution is safe for your plants but potent enough to kill fungus gnat larvae.
- Apply the Solution: Pour the hydrogen peroxide solution onto the soil, ensuring it reaches the root zone. The solution will fizz when it comes into contact with the larvae, killing them.
- Repeat as Needed: You may need to repeat the treatment once a week until the gnat infestation is under control.
Proper Dilution and Application Method
It’s essential to use the right dilution to avoid harming your plants. Always dilute 3% hydrogen peroxide with water at a ratio of 1:4. Applying it directly to the soil will help ensure the larvae come in contact with it.
Pros and Cons of Hydrogen Peroxide Treatment
Pros:
- It works quickly to kill larvae.
- It also helps oxygenate the soil, which can benefit the plant.
Cons:
- It doesn’t target adult gnats.
- Overuse can harm the beneficial microbes in the soil.
Diatomaceous Earth
Diatomaceous earth (DE) is a natural substance made from fossilized remains of diatoms. It works as a mechanical insecticide, drying out and killing insects, including fungus gnat larvae.
What Is Diatomaceous Earth and How It Works as a Mechanical Insecticide

Diatomaceous earth works by absorbing the waxy coating on the exoskeletons of insects, causing them to dry out and die. It’s a safe and non-toxic option for controlling gnats in the soil.
How to Apply Diatomaceous Earth to the Soil
- Sprinkle DE on the Soil: Lightly dust the top layer of soil with diatomaceous earth.
- Water After Application: After applying, water the soil thoroughly. The DE will stay on the soil surface but won’t dissolve in water, where it will continue to kill larvae over time.
Precautions When Using This Method
- Use Food-Grade DE: Make sure to use food-grade diatomaceous earth, which is safe for plants and pets.
- Avoid Breathing in the Dust: DE is a fine powder, so avoid inhaling it by wearing a mask during application.
Bacteria Thuringiensis (BT)
Bacillus thuringiensis (BT) is a bacteria that specifically targets the larvae of fungus gnats without harming plants or animals.
Introduction to BT and Its Role in Fungus Gnat Control
BT is a naturally occurring bacteria that kills insect larvae by producing toxins that are harmful to them. It is available in various formulations, such as mosquito bits or as a liquid to apply directly to the soil.
How BT Targets Fungus Gnat Larvae Without Harming Plants
BT targets the digestive systems of insect larvae, making it an effective treatment for fungus gnats. It does not affect humans, pets, or plants, making it a safe and effective solution.
When and How to Apply BT for Best Results
- When to Apply: Apply BT when you first notice the presence of fungus gnat larvae. If you use mosquito bits, they can be added to the soil immediately.
- How to Apply: If using a liquid formulation, mix it with water and apply directly to the soil.
Ongoing Maintenance and Prevention
Once the infestation is under control, it’s crucial to maintain your plant care routine to prevent future fungus gnat problems.
Proper Watering Techniques
- How Overwatering Contributes to Fungus Gnat Infestations: Fungus gnats thrive in moist conditions, especially when the soil is overly wet. To prevent future infestations, ensure that you water your plants properly and avoid overwatering.
- Ensuring Good Drainage in Pots and Planters: Make sure that your pots have proper drainage holes to allow excess water to escape. This will help keep the soil from staying too moist and reduce the risk of fungus gnats.
How to Maintain Dry Soil to Prevent New Infestations
- Allow the Top Layer of Soil to Dry: Fungus gnats prefer damp soil. Allow the top layer to dry out before watering again.
- Use Bottom Watering: Water your plants from the bottom, which helps keep the surface of the soil dry and discourages fungus gnats from breeding.
Isolating New Plants

One of the best ways to prevent the spread of fungus gnats is to isolate new plants before introducing them to your home. This simple step can save you from a potential infestation.
How to Check New Plants for Fungus Gnats Before Bringing Them Inside
Before bringing any new plant into your home, inspect the plant carefully for signs of pests. Look at the soil surface and check for any flying adults, eggs, or larvae. If the plant is infested, you might consider treating it before introducing it to your collection.
- Look for Adult Gnats: If you see flying gnats around the plant, it’s likely that you have an infestation.
- Examine the Soil: Check the soil for signs of larvae or decaying organic matter, which may attract fungus gnats.
Quarantine Measures to Prevent Cross-Contamination
- Place New Plants in Isolation: Keep new plants in a separate area for 1-2 weeks before introducing them to your other plants. This will help you ensure they are pest-free.
- Monitor Regularly: Keep a close eye on your quarantined plants during this period. If any gnats appear, treat the plant immediately before it’s too late.
By isolating new plants, you can prevent any potential infestations from spreading to your existing plants.
Regular Inspection and Treatment of New Plants
After the quarantine period, if the plant appears to be pest-free, you can gradually introduce it to the rest of your collection. However, it’s important to keep inspecting your plants regularly for signs of gnats.
- Check for Eggs and Larvae: Continue to monitor the plants for any signs of eggs or larvae in the soil.
- Treat if Necessary: If you spot any pests, immediately treat the plant before allowing it to interact with other plants in your home.
Preventative Soil Treatments
Using preventative soil treatments can help stop fungus gnats before they even become an issue. By making a few simple changes to the soil, you can keep these pests at bay.
Adding Sand or Gravel to the Top Layer of Soil

A layer of sand or gravel on the top of the soil can help deter fungus gnats from laying their eggs. This method works by making the soil surface less hospitable to these pests, preventing them from burrowing into the soil.
- Why It Works: Fungus gnats prefer to lay eggs in moist, organic-rich soil. By covering the top of the soil with a layer of sand or gravel, you make it more difficult for them to lay eggs in the first place.
Using Neem Oil as a Preventative for Fungus Gnat Eggs and Larvae
Neem oil is a natural pesticide that works effectively against a wide range of pests, including fungus gnat larvae. Applying neem oil as a soil drench can help prevent gnat infestations from taking hold in the first place.
- How to Apply Neem Oil: Mix neem oil with water according to the instructions on the bottle, then water your plants with the solution. This will help kill any eggs or larvae in the soil and prevent further infestations.
Neem oil also acts as a natural fungicide, which can help prevent root rot and other soil-borne diseases.
Repotting Plants into Fresh Soil to Eliminate Larvae and Eggs

Repotting your plants every year or when you notice an infestation can help eliminate gnat larvae and eggs that may be hiding in the soil.
- How to Repot: Gently remove the plant from its current pot, shake off the old soil, and place it in a new pot with fresh, well-draining soil. Be sure to clean the pot thoroughly before reusing it to avoid reinfesting the plant.
Repotting is an effective method to remove any lingering larvae or eggs and provide your plants with fresh soil, which is beneficial for their overall health.
How Long Does It Take to Get Rid of Fungus Gnats?
Fungus gnats can be a persistent problem, but with the right methods, you can expect results in a reasonable amount of time. However, the exact duration will depend on the severity of the infestation and the methods used.
Expected Time Frame for Each Method
- Immediate Relief: Some methods, such as drying out the soil and using cider traps, can provide immediate relief by killing adult gnats and preventing new larvae from hatching.
- Long-Term Solutions: Methods like using mosquito bits, sticky traps, and diatomaceous earth take a bit longer to work but provide long-lasting results. You may need to repeat these treatments every 1-2 weeks for a more thorough solution.
Immediate Results vs Long-Term Solutions
Immediate solutions, such as cider traps or hydrogen peroxide, work fast to reduce the adult gnat population. However, long-term solutions like mosquito bits, BTI, and neem oil will take more time but will continue to work after the initial infestation is under control.
When to Expect the First Signs of Improvement

After applying treatments, you should start seeing signs of improvement within a week or two. The first visible changes include a reduction in the number of adult gnats and an improvement in plant health as larvae are eliminated from the soil.
- Look for Fewer Adult Gnats: As the adult gnats are caught in traps or killed by treatments, their population should decrease.
- Healthier Plants: Your plants should start to show signs of recovery, such as improved leaf color and growth, as the root system regains strength.
How Often Should You Repeat Treatments?
Depending on the method used, treatments may need to be repeated to fully eliminate the infestation.
Frequency of Application for Sticky Traps, Mosquito Bits, and Other Methods
- Sticky Traps: Replace sticky traps once a week or whenever they are filled with gnats.
- Mosquito Bits: Reapply mosquito bits every 30 days for ongoing control.
- Other Methods: Repeat methods like hydrogen peroxide and neem oil every 1-2 weeks until the infestation is completely under control.
How Long to Keep Treatments Going for Best Results
For the most effective results, keep applying treatments for at least 4 to 6 weeks. This ensures that all stages of the fungus gnat lifecycle are targeted, from eggs to adult gnats.
- Repeat as Necessary: Continue treatments until you no longer see adult gnats or signs of larvae. Be patient, as fungus gnat infestations can take time to completely eradicate.
Adjusting Frequency Based on the Severity of the Infestation
If the infestation is severe, you may need to increase the frequency of treatments. In extreme cases, you may need to combine multiple methods, such as sticky traps, mosquito bits, and neem oil, to control the infestation more effectively.
Combining Methods for Maximum Effectiveness
In this section, we’ll focus on the importance of combining various methods to ensure you successfully eliminate fungus gnats from your indoor plants. Each method targets a different aspect of the problem, and by combining them, you can enhance their effectiveness and achieve faster, more permanent results.
Why a Combined Approach Works Best
A combined approach is often the most effective way to control a fungus gnat infestation. By targeting both the larvae in the soil and the adults in the air, you can disrupt the entire lifecycle of the gnats. Using multiple methods also increases the likelihood that you will catch all stages of the infestation, ensuring that no gnats survive.
Combining Soil Treatments with Traps
- Soil Treatments: Use treatments like mosquito bits, diatomaceous earth, and hydrogen peroxide to target the larvae in the soil. These treatments will kill the larvae and prevent them from growing into adults.
- Traps: Place sticky traps around your plants to catch the adult gnats as they fly around. The traps will help you monitor the effectiveness of your treatments while reducing the number of adult gnats laying new eggs.
This combination ensures that you are targeting both the root cause of the infestation (the larvae) and the source of new gnats (the adults).
Using Natural and Chemical Treatments Together
While natural treatments like neem oil and chamomile tea are effective for controlling fungus gnats, you may need to use chemical solutions like mosquito dunks or hydrogen peroxide for faster results. Combining these methods will help you manage the infestation more effectively while keeping your plants safe.
- Neem Oil: Use neem oil as a preventative measure by watering your plants with a neem oil solution. It can also help control larvae and prevent new infestations.
- Mosquito Dunks: Use mosquito dunks or mosquito bits for a longer-term solution. These release BTI into the soil, targeting the larvae without harming your plants.
By rotating natural and chemical treatments, you can maintain a balanced approach to pest control that minimizes the risk of harm to your plants while keeping the gnats at bay.
How to Tailor Treatments Based on Your Plant Care Routine and Home Environment
Different plants and home environments require different approaches. By tailoring your treatments to your specific needs, you can ensure that your plants stay healthy and fungus gnat-free.
For Moisture-Loving Plants
If you have plants that require high humidity or consistently moist soil, such as ferns or peace lilies, you’ll need to adjust your treatment plan. These plants may be more susceptible to fungus gnats because they thrive in moist conditions. Here’s how you can adapt:
- Use Bottom Watering: Bottom watering helps reduce moisture on the soil surface, making it less inviting to fungus gnats.
- Increase Drainage: Ensure that your pots have proper drainage to prevent water from accumulating at the bottom of the pot, which can attract gnats.
- Use Preventative Measures: Apply neem oil or diatomaceous earth as a preventative measure to keep gnats from infesting the soil.
For Dry-Soil Plants
If you’re growing plants that prefer dry soil, such as succulents or cacti, you’ll need to ensure that the soil dries out thoroughly between waterings. Fungus gnats thrive in damp conditions, so dry soil will naturally discourage them from breeding.
- Allow Soil to Dry Out: Allow the soil to dry out completely between waterings to make the environment less hospitable for gnats.
- Use Mosquito Bits: Use mosquito bits or dunks to target any potential larvae that may be hiding in the soil.
- Sticky Traps: Place sticky traps around the plants to catch any adult gnats that might still be flying around.
By tailoring your approach to your plants’ specific needs, you can maintain a healthy environment for both the plants and yourself.
Final Thoughts
Fungus gnats may seem like a minor inconvenience, but they can cause significant damage to your indoor plants if not controlled properly. By following the steps outlined in this guide and using a combination of methods, you can eliminate the infestation and prevent future occurrences. Whether you’re dealing with a small number of gnats or a full-blown infestation, these strategies can help you restore your plants to their healthy, thriving state.
Why a Multi-Pronged Approach is Necessary
A single treatment may not always be sufficient to fully eliminate a fungus gnat problem. These pests can breed quickly, and their larvae can remain hidden in the soil for extended periods. By using a combination of methods, you increase the chances of breaking the pest lifecycle and preventing reinfestation.
- Short-Term Relief: Immediate methods like cider traps and hydrogen peroxide provide short-term relief by killing adults and larvae.
- Long-Term Control: Ongoing treatments with mosquito bits, sticky traps, and preventive measures like neem oil provide long-term control and keep gnats from returning.
Combining Prevention with Treatment
In addition to treating your plants, it’s important to adopt preventive practices that reduce the chances of future infestations:
- Watering Practices: Avoid overwatering and allow the soil to dry out between waterings.
- Soil Treatment: Add sand or gravel to the top layer of soil to prevent egg-laying.
- Isolation of New Plants: Always inspect and quarantine new plants before adding them to your collection.
By implementing a combination of treatments and preventive measures, you can create a fungus gnat-free environment for your plants.
Conclusion
In this final section, we will summarize the key takeaways from this guide and provide you with some additional tips for maintaining a healthy indoor garden.
Recap of Effective Methods
- Immediate Solutions: Use cider traps, sticky traps, and hydrogen peroxide for quick relief.
- Long-Term Control: Mosquito bits, diatomaceous earth, and neem oil are effective for long-term control.
- Preventive Measures: Proper watering techniques, adding sand or gravel to the soil, and isolating new plants can help prevent future infestations.
Tips for Ongoing Plant Care
- Regular Inspections: Check your plants regularly for signs of pests.
- Maintain Proper Moisture Levels: Adjust your watering schedule to avoid creating a moist environment that attracts fungus gnats.
- Repot When Necessary: Repot your plants every year to refresh the soil and remove any eggs or larvae.
By combining effective treatments with preventive care, you can ensure that your indoor plants remain healthy and free of fungus gnats.
Final Recommendation
If you’re serious about keeping your plants safe from fungus gnats, a multi-faceted approach is essential. By using a combination of soil treatments, sticky traps, and preventive measures, you can eliminate the current infestation and prevent future ones. With patience and consistent care, you’ll be able to maintain a thriving, fungus gnat-free garden.
This concludes the guide to getting rid of fungus gnats in your indoor plants. Follow the outlined steps, and you will soon see an improvement in the health of your plants and a reduction in the number of gnats. Happy gardening!