Skip to content
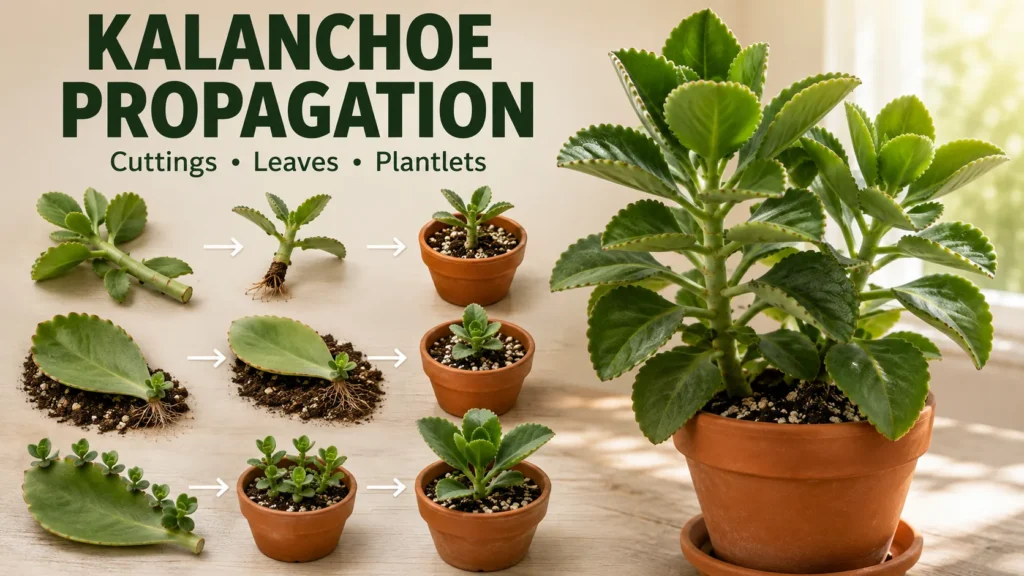
Kalanchoe is one of the easier succulents to multiply at home. I usually recommend stem cuttings for beginners because the process is simple, needs few supplies, and works well for many Kalanchoe types.
You can also grow new plants from leaves, offsets, or plantlets. The best method depends on the type of Kalanchoe you have.
Quick Answer: How Do You Propagate Kalanchoe?
The easiest way to propagate Kalanchoe is from a healthy stem cutting. Take a 2–3 inch non-flowering cutting, remove the lower leaves, and let the cut end dry for a few days. Plant it in fast-draining succulent soil, give it bright indirect light, and avoid excess water while roots develop.
Which Kalanchoe Propagation Method Is Best?
Kalanchoe can grow from several types of plant material, but some methods are easier than others.
| Propagation method | Best for | Difficulty | My recommendation |
| Stem cuttings | Most common Kalanchoe types | Easy | Best overall |
| Leaf cuttings | Many succulent Kalanchoe types | Easy to moderate | Good option |
| Plantlets | Kalanchoe daigremontiana and similar types | Very easy | Best when available |
| Offsets | Types that produce baby plants at the base | Easy | Good species-specific option |
| Seeds | Breeding or growing from seed | Moderate | Not needed for most home growers |
| Water propagation | Some stem cuttings | Variable | Optional |
I prefer stem cuttings for most Kalanchoe plants. They give you a piece of the parent plant that already has a stem and leaves, so the new plant can start growing once roots form.
Leaf propagation can also work well. Kalanchoe is a succulent, and some types can produce roots and new growth from a healthy leaf.
Plantlets are even easier for species that produce them naturally. Kalanchoe daigremontiana is a good example because small plantlets can form along the edges of its leaves.
When Is the Best Time to Propagate Kalanchoe?
Spring and early summer are good times for Kalanchoe propagation because the plant is usually in active growth.
I prefer to propagate when the parent plant looks healthy and is producing fresh growth. A weak, damaged, or badly stressed plant is a poor source for cuttings.
You can also propagate Kalanchoe indoors at other times of year if the plant has enough warmth and light. Growth may be slower during darker or cooler periods.
What You Need for Kalanchoe Propagation
You do not need many supplies.
For stem or leaf propagation, prepare:
- A healthy Kalanchoe plant
- Clean, sharp scissors or pruning shears
- A small pot with drainage holes
- Fast-draining succulent or cactus soil
- Perlite, pumice, or another coarse material if needed
- A clean work surface
- A bright spot with indirect light
I like to prepare the pot and soil before taking the cutting. This lets me handle the fresh cutting as little as possible.
A clean tool also helps reduce the chance of spreading problems from one plant to another.
How to Propagate Kalanchoe From Stem Cuttings

Stem cuttings are my first choice for most Kalanchoe plants.
A healthy stem cutting can develop roots and become a separate plant with the same basic traits as the parent plant.
Step 1: Choose a Healthy Stem
Look for a firm, healthy stem with good leaf growth.
Choose a non-flowering shoot if possible. Flowering takes energy from the plant, while a healthy vegetative shoot is a better choice for propagation.
Avoid stems that are:
- Soft
- Black or brown
- Damaged
- Diseased
- Very weak
- Covered with pests
For many Kalanchoe plants, a cutting around 2–3 inches long with a few healthy leaves is a good starting point.
Step 2: Take the Cutting
Use clean, sharp scissors or shears to make a clean cut.
Try to take the cutting just below a leaf node. A node is the point where a leaf joins the stem.
Remove the lower leaves so you have a short section of bare stem that can sit in the growing medium.
Keep a few healthy leaves near the top of the cutting.
Step 3: Let the Cutting Callus

This is one step I would not skip.
Place the cutting in a dry location with good airflow and let the cut end dry. The fresh wound will form a dry layer called a callus.
The exact time varies with the cutting and growing conditions. A few days is often enough for a small Kalanchoe cutting.
Do not place the fresh cutting straight into wet soil.
Step 4: Plant the Cutting
Once the cut end has dried, prepare a small pot with fast-draining soil.
Make a small hole in the soil first. Place the callused end into the hole and gently press the soil around the stem.
Do not bury most of the cutting. It only needs enough depth to stay upright and keep the lower stem in contact with the soil.
A succulent or cactus mix with good drainage works well.
Step 5: Give the Cutting the Right Light
Place the new cutting in bright indirect light.
Avoid strong midday sun at first. An unrooted cutting has less ability to replace water lost through its leaves, so harsh sunlight can cause extra stress.
As the cutting develops roots and new growth, you can slowly move it into stronger light if that suits the Kalanchoe type.
Step 6: Water Carefully
This is where many new cuttings fail.
Kalanchoe stores water in its fleshy leaves and stems. A cutting does not need constant moisture while it is trying to produce roots.
I prefer to keep the soil on the dry side rather than keeping it wet. Too much water can encourage stem or root rot, especially before the cutting has developed a useful root system.
Avoid soaking the pot repeatedly.
Step 7: Check for Root Growth
Root development may take a few weeks.
You may notice:
- New leaves
- New stem growth
- A firmer, more established plant
- Resistance when the cutting is gently moved
I would not pull on the cutting often to check for roots. Give it time and watch for new growth instead.
How to Propagate Kalanchoe From Leaf Cuttings

Leaf propagation is another useful method for Kalanchoe.
It can take longer than stem propagation, and success varies between species. Still, many succulent Kalanchoe types can grow from healthy leaves.
Step 1: Choose a Healthy Leaf
Pick a mature, healthy leaf with no signs of rot, pests, or damage.
Remove it carefully from the parent plant. Try to keep the leaf base intact.
A damaged leaf may have a lower chance of producing new growth.
Step 2: Let the Leaf Dry
Place the leaf somewhere dry and allow the cut area to callus.
For succulent leaf cuttings, allowing the cut surface to dry for a day or two before planting is a common approach.
Step 3: Place the Leaf on Soil
Use a fast-draining propagation mix.
Lay the callused leaf on the surface of the soil. You can also position the base of the leaf so it lightly touches the mix.
Do not bury the entire leaf.
Step 4: Give It Bright Light
Place the pot in bright indirect light.
Keep the environment warm and avoid harsh direct sun while the new plant is still forming.
Step 5: Wait for New Growth
Leaf propagation can take longer than stem cuttings.
With suitable Kalanchoe types, roots and small new plants can develop from the base of the leaf. The original leaf may slowly lose firmness as the new growth uses its stored energy.
Do not remove the original leaf too early.
How to Propagate Kalanchoe From Plantlets

Plantlets are small baby plants that form directly on certain Kalanchoe plants.
This method is especially useful for Kalanchoe daigremontiana, also called Mother of Thousands. This species can produce tiny plantlets along the edges of its leaves.
Which Kalanchoe Produces Plantlets?
Kalanchoe daigremontiana is one of the best-known examples.
The small plants form along the leaf margins. Once they are developed enough, they can be removed and grown separately.
This is different from a normal stem cutting because the young plant forms naturally on the parent plant.
How to Remove and Plant Kalanchoe Plantlets
Wait until the plantlets are large enough to handle.
Then:
- Gently remove a plantlet from the parent leaf.
- Prepare a small pot with fast-draining soil.
- Place the base of the plantlet against the soil.
- Keep it stable.
- Give it bright indirect light.
- Avoid keeping the soil wet.
Small plantlets can develop roots within a few weeks under suitable conditions.
I would avoid handling tiny plantlets more than needed. They are still developing, so gentle treatment helps.
How to Propagate Kalanchoe From Offsets
Some Kalanchoe types can produce small baby plants near the base of the parent plant.
These are often called offsets or pups.
An offset is different from a plantlet that grows along a leaf edge. An offset develops from the base or lower part of the parent plant.
If an offset has its own roots, you can gently separate it and pot it on its own.
Use a small pot with fast-draining soil. Keep the new plant in bright indirect light while it settles.
This method depends on the species, so I would not expect every Kalanchoe to produce offsets.
Can You Propagate Kalanchoe in Water?
You can experiment with water propagation using some Kalanchoe stem cuttings, but I would not make it my main method.
Kalanchoe is a succulent, so soil propagation fits its normal growing needs well. Water also creates a very different environment from the dry, well-drained conditions that Kalanchoe prefers.
If you try water propagation, use a healthy stem cutting and keep only the lower part of the stem in water. Do not allow the leaves to sit in the water.
Once roots form, move the cutting into a fast-draining succulent mix.
For most beginners, I would choose a callused stem cutting planted in suitable soil instead.
Can You Grow Kalanchoe From Seed?
Yes, Kalanchoe can grow from seed.
However, seeds are usually not the first choice for someone who simply wants more plants at home.
Stem cuttings, leaf cuttings, plantlets, and offsets are faster and easier for many home growers.
Seed propagation makes more sense if you want to grow plants from seed or work with breeding and plant selection.
How Kalanchoe Propagation Differs by Species

One useful point is that Kalanchoe propagation is not exactly the same for every species.
| Kalanchoe type | Useful propagation method |
| Kalanchoe blossfeldiana | Stem and leaf cuttings |
| Calandiva | Stem cuttings |
| Kalanchoe daigremontiana | Plantlets |
| Kalanchoe tomentosa | Stem or leaf cuttings |
| Kalanchoe beharensis | Stem and leaf propagation |
| Kalanchoe luciae | Vegetative propagation such as offsets or cuttings |
For Kalanchoe blossfeldiana, stem cuttings are a simple choice. This also applies to many florist Kalanchoe plants.
Kalanchoe daigremontiana is different because its natural plantlets give you an easy way to make new plants.
For Kalanchoe tomentosa, leaf and stem methods can both be useful, although stem cuttings are often easier to manage.
This is why I prefer a method-based approach rather than saying one propagation method works exactly the same for every Kalanchoe.
How to Care for Kalanchoe Cuttings After Planting

Once you plant a cutting, your job is mainly to provide stable conditions while roots develop.
Light
Give the cutting bright indirect light.
Avoid sudden exposure to intense direct sun.
Water
Use a light touch with water.
Let the soil dry rather than keeping it constantly wet. A cutting with no established roots has little reason to sit in saturated soil.
Soil
Use a fast-draining succulent or cactus mix.
You can add perlite or another coarse material if your existing mix holds too much water.
Temperature
Keep the cutting in a comfortable indoor temperature range.
Cold conditions can slow root development, while very hot conditions can increase stress and moisture loss.
Pot Size
Use a small pot rather than a large container.
A large amount of wet soil around a tiny cutting can stay wet for too long.
Common Kalanchoe Propagation Problems

Propagation does not always work on the first try. Most failures come from poor cutting material, excess moisture, poor light, or unsuitable timing.
The Kalanchoe Cutting Turns Soft
A soft or dark stem can be a sign of rot.
Check the soil first. If it stays wet for long periods, reduce watering and improve drainage.
If the rot has moved far into the cutting, it may be better to discard the damaged section and start again with healthy material.
The Kalanchoe Cutting Does Not Root
Give it time before assuming it has failed.
Check:
- Light
- Temperature
- Soil drainage
- Cutting health
- Moisture
- Season
Avoid digging up the cutting every few days. This can disturb new roots before they become established.
The Cutting Starts to Shrivel
A small amount of wrinkling does not always mean the cutting has failed.
Kalanchoe cuttings can use stored water while they form roots.
Severe shriveling, however, can point to excessive dryness, strong heat, or a cutting that was already weak.
The Leaf Cutting Does Nothing
Leaf propagation can be slower than stem propagation.
Some Kalanchoe types also respond better to leaf propagation than others.
Give the leaf suitable light, good drainage, and time before throwing it away.
Mold Appears on the Cutting
Mold usually points to too much moisture or poor airflow.
Remove badly affected material and review the growing conditions.
The propagation mix should not remain soggy.
A Plantlet Dies After Separation
Very small plantlets can struggle if removed too early.
Make sure the young plant is developed enough to handle and give it a well-drained growing medium.
Avoid heavy watering while it establishes.
How Long Does Kalanchoe Propagation Take?
There is no single timeline for every Kalanchoe cutting.
Healthy stem cuttings can begin rooting within a few weeks under good conditions.
Leaf cuttings can take longer.
Plantlets may also establish at different speeds depending on their size and growing conditions.
Instead of focusing only on the number of days, I look for signs of active growth. New leaves, stronger growth, and good anchoring are better signs that the new Kalanchoe is becoming established.
When Can You Treat a New Kalanchoe Like a Mature Plant?
Once the cutting has a useful root system and starts producing new growth, you can slowly move it into a normal Kalanchoe care routine.
Do not make a sudden change from gentle propagation conditions to strong sunlight or heavy watering.
Increase light gradually if needed and keep the soil well drained.
At this stage, the new plant can follow the same basic care routine as its parent Kalanchoe.
Final Thoughts
Kalanchoe propagation is easier once you choose the right method for your plant.
For most Kalanchoe types, I would start with a healthy stem cutting. Let the cut end callus, use fast-draining soil, provide bright indirect light, and keep watering under control while roots develop.
If you have Kalanchoe daigremontiana, use its natural plantlets when possible. For other types, leaf cuttings or offsets may also work. The key is to match the propagation method to the plant and give the new cutting enough time to establish.
Kalanchoe Propagation FAQs
Can you propagate Kalanchoe from a cutting?
Yes. Stem cuttings are one of the easiest methods.
Can you propagate Kalanchoe from a leaf?
Yes. Many succulent Kalanchoe types can grow from leaf cuttings.
Should Kalanchoe cuttings dry before planting?
Yes. Let the cut surface dry and form a callus before planting.
Can Kalanchoe grow roots in water?
Some stem cuttings can root in water, but soil propagation is my preferred method.
How long does Kalanchoe take to root?
Stem cuttings can root in a few weeks under suitable conditions.
Can you propagate Kalanchoe from plantlets?
Yes. Kalanchoe daigremontiana is a well-known example of a plant that produces natural plantlets.
Do you need rooting hormone for Kalanchoe?
No. Kalanchoe stem cuttings can root without it.
Can you propagate Kalanchoe after flowering?
Yes, but I prefer healthy vegetative shoots rather than flowering shoots for propagation.